Hey Sales.Rocky 👋
Setting up your DKIM record is a crucial part of ensuring the security of your email and preventing its misuse. It also improves your email deliverability in combination with other email authentication processes. If you want to find out what a DKIM record is and how you can set one up for your domain, read on ⬇️
What is a DKIM record?
A DKIM record is used as a part of the DKIM (DomainKeys Identified Mail) email authentication method, helping to verify the email sender. It also guarantees that parts of the email have not been altered after sending. In other words, DKIM serves to detect a forged email address and prevent tampering with an email in transit before it reaches its destination.
What is the purpose of a DKIM record?
A DKIM record contains a set of encryption keys, one public and one private for the purpose of message verification. DKIM uses the private key to assign a digital signature in the header to every email sent, which can be decrypted by the public key available to the receiving email server. If both keys check out fine, that means that the email sent was authorised by your domain, also the message was not altered after it was sent.
Can you set up multiple DKIM records?
The number of DKIM records you can have depends on the number of email services you use to send your emails on behalf of your domain. For example, if you use both Google Workplace and Zoho Mail, both services will have separate DKIM records. This way both email services have a corresponding set of DKIM keys for verification purposes.
How to check your DKIM record
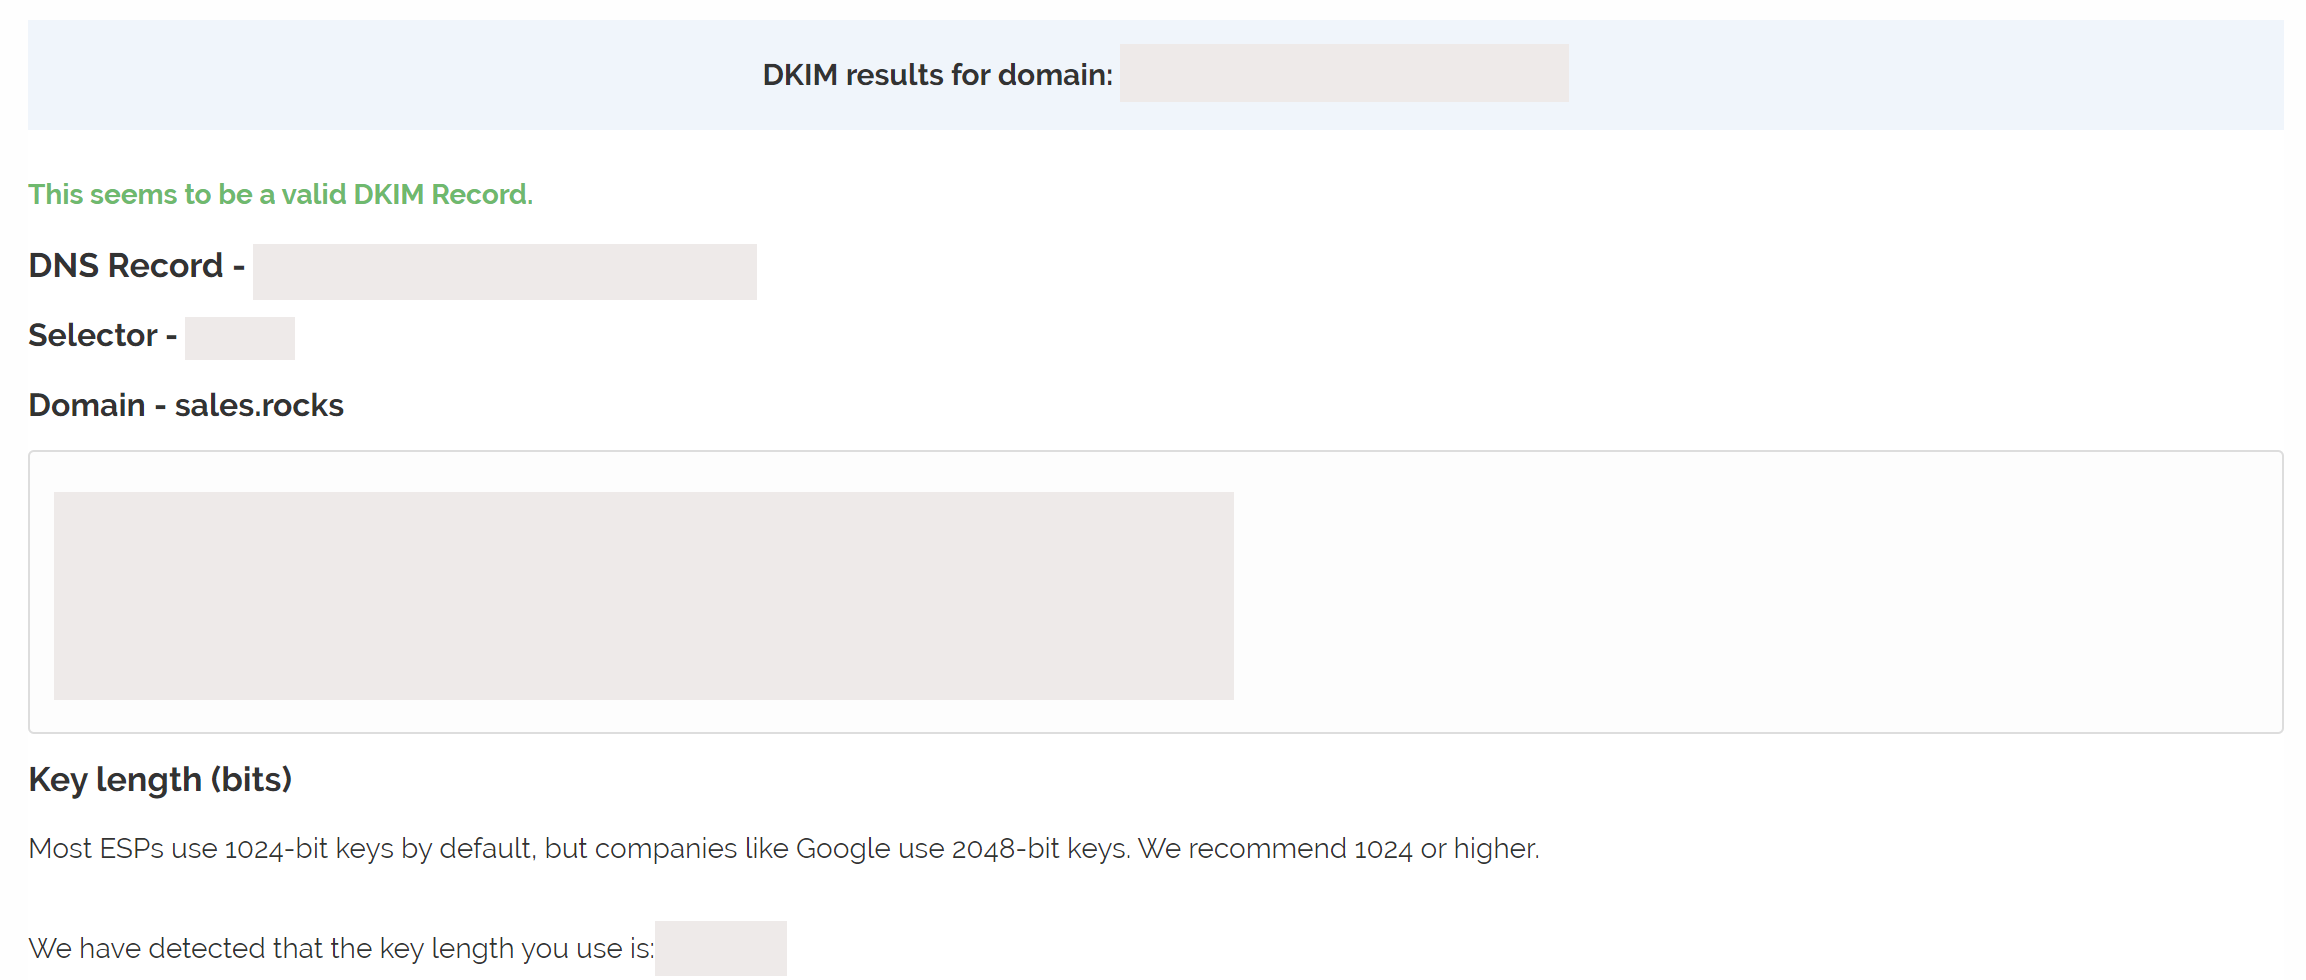
To check if your DKIM record is properly set up and all of your DKIM records are in order, use this DKIM checking tool 👀
How to set up a DKIM record for your sending domain
We’ll go over the process of how to generate and set up your Google (Gmail), Microsoft Office 365 (Outlook) and Zoho (covering multiple services) DKIM record. In this step-by-step tutorial, we’ll focus on several domain providers and also show you a general DKIM record setup that you can use for other domain providers as well as how to set up a DKIM record in cPanel.
Generating a DKIM record in Google, Microsoft Office and Zoho
First, you’ll need to generate a DKIM record which consists of a domain key and TXT record value.
Wait, what about the DKIM key length, 1024 or 2048-bit?
The difference between generating a 2048 or 1024 bit is security. While a 2048-bit DKIM key is more secure, your domain host may not support 2048-bit DKIM keys. It’s best to check with your domain host just in case, otherwise, a 1024-bit DKIM key is a good enough option. To fall back on, as it still provides you with a level of security, in regards to your email sending.
Mhm, and what about the DKIM selector?
You should only change the DKIM selector if you already have a DKIM record for your domain with the selector you want to use, or you’re using multiple email services, in which case it is a good idea to have separate DKIM selectors for each email service.
Generate a Google DKIM record
To generate a Google DKIM record in Google Workplace, follow these steps:
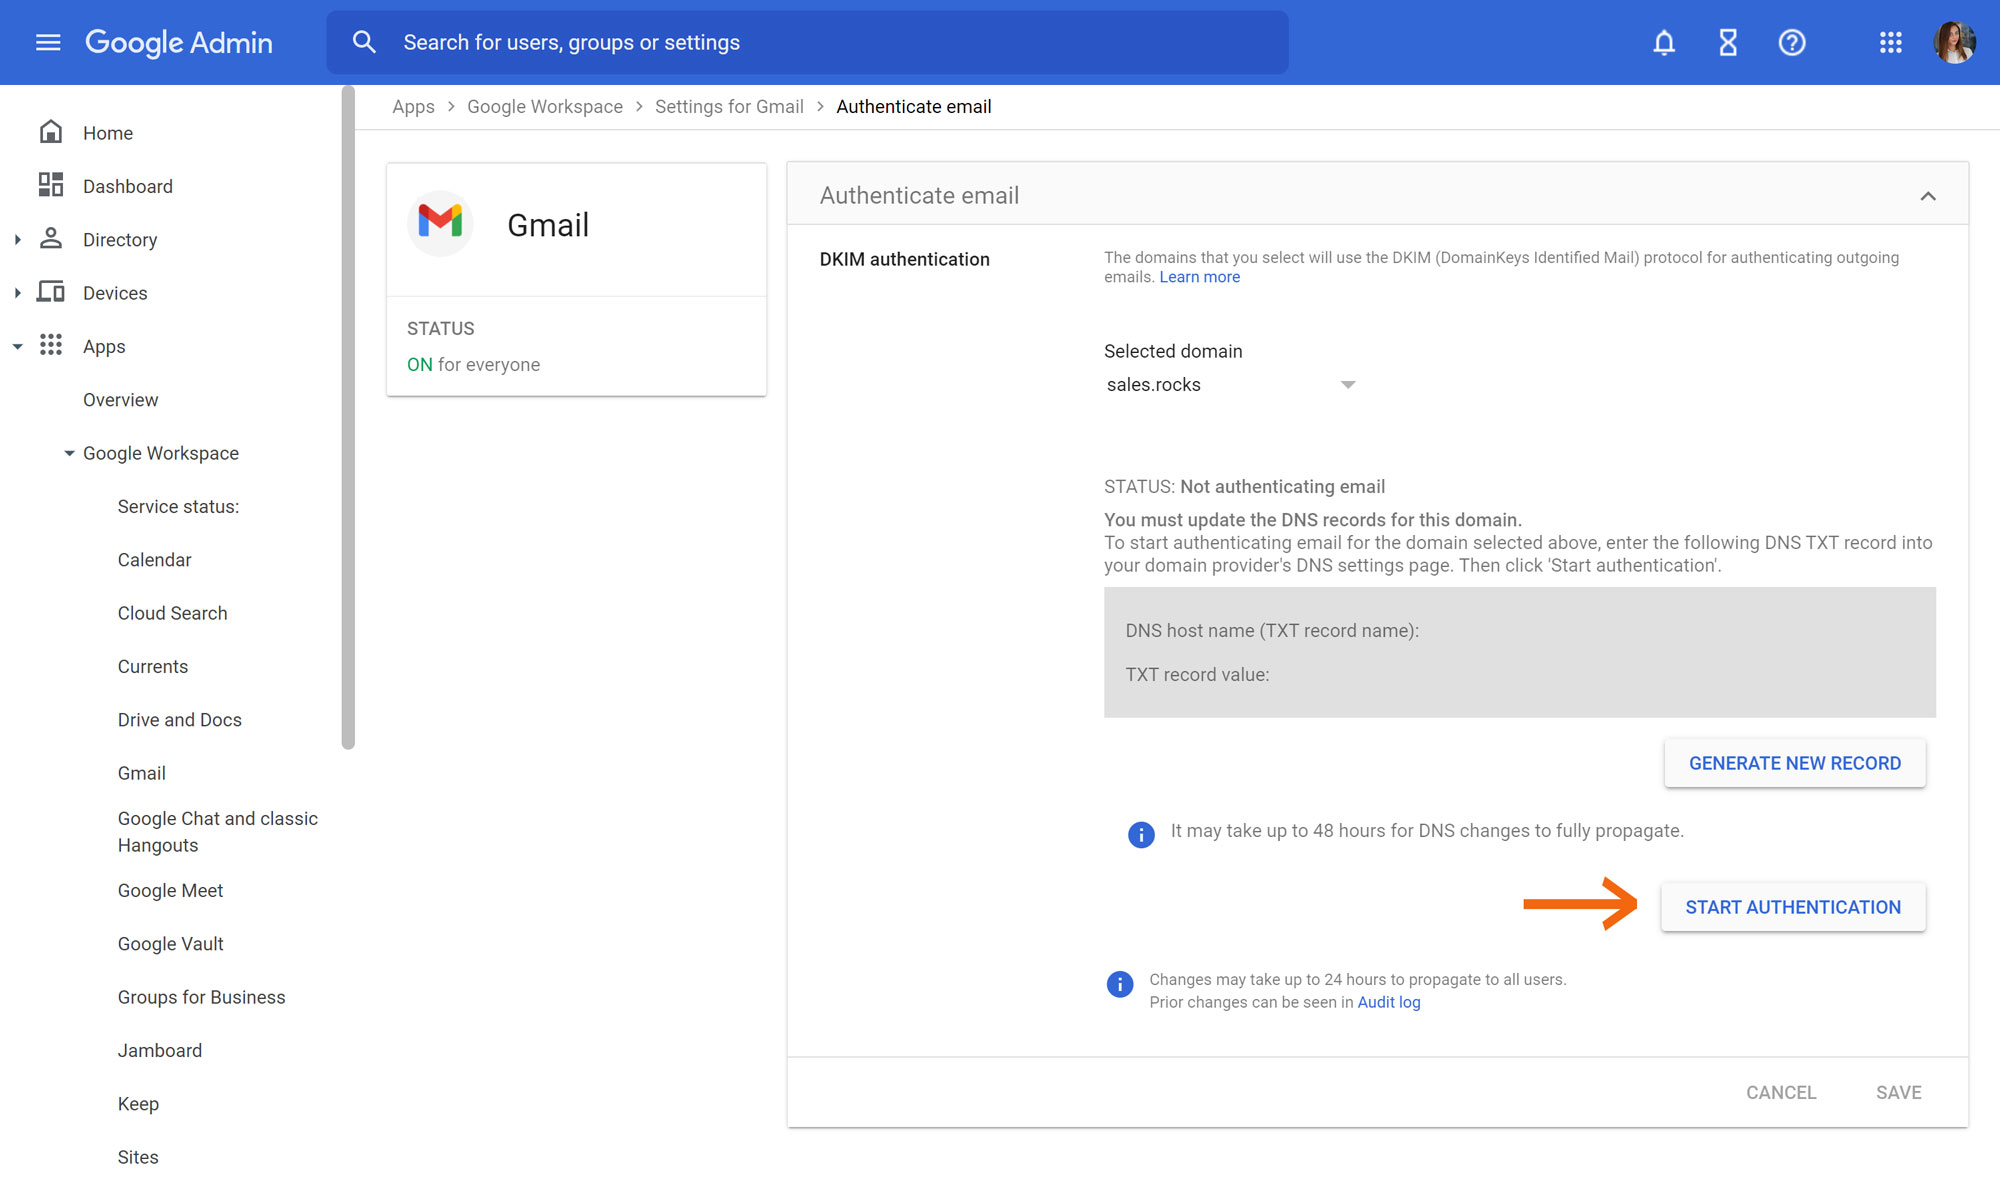
1. Log in to Google Admin Console 👀
2. Go to Apps - > Google Workspace >> Gmail
3. Click on Authenticate email

4. Select your domain and click on generate a new record

5. Copy & Paste the DNS Host Name and TXT record value from Google to your domain’s provider DKIM set-up (for this step scroll down)
6. Go back in Google Workspace window and click on START AUTHENTICATION and wait 24-62 hours for the process to complete
Generate a Microsoft Office DKIM record
To generate a Microsoft Office DKIM record in Microsoft Office 365, do the following:
1. Log in to Microsoft 365 Admin Center 👀
2. Go to Policies & rules >> Threat Policies >> DomainKeys Identified Mail (DKIM)

3. Click on your domain
4. In the newly opened window, click on Create DKIM keys
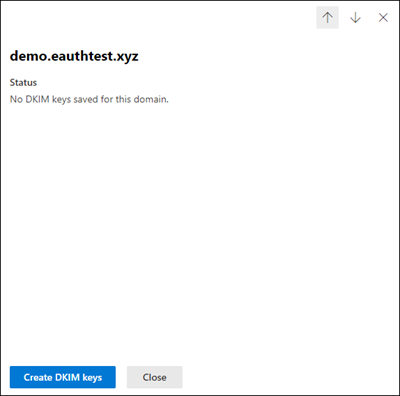
5. Copy & Paste the Hostname and Points to address or value to your domain’s provider DKIM set-up (for this step scroll down

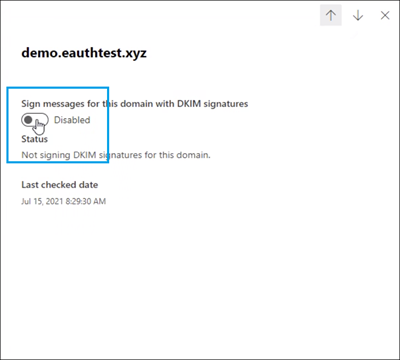
6. Go back to the Microsoft Admin Center window, click on the domain and in the newly opened window select Enable for Sign messages for this domain with DKIM signatures
7. Wait 24-48 hours for the process to complete
Generate a Zoho Mail DKIM record
To generate a Zoho Mail DKIM record in Zoho, follow these steps:
1. Log in to the Zoho Mail Control Panel 👀
2. From the left menu select Domains
3. Click on your domain

4. In Email Configuration select DKIM
5. Click on Add to add a new selector

6. Copy & Paste the TXT Name and TXT Value/Points To/Destination from Zoho to your domain’s provider DKIM set-up (for this step scroll down)
7. Go back in the Zoho Mail Control Panel window, click Verify and wait for 24-48 for the process to complete
Google, Microsoft Office 365 and Zoho DKIM record setup:
-
General DKIM record setup for all domain providers
-
DKIM record setup for cPanel
-
DKIM record setup for Cloudflare
-
DKIM record setup for Bluehost
-
DKIM record setup for GoDaddy
-
DKIM record setup for Namecheap
Note: You may need to wait from 30 minutes or up to 48 for the changes to take effect in your domain provider’s settings.
Now let’s do this by the book, nice and easy.
General DKIM record setup for all domain providers
1. Log in to your domain providing service
1. Go to the DNS settings
2. Add a new record
3. Select the TXT record type for Google and Zoho, CNAME for Microsoft Office
4. In Host or Name field put the selector from the field:
- DNS Host Name (Google)
- TXT Name (Zoho)
- Host name (Microsoft Office)
5. In the Record field put the TXT record from the field:
- TXT record value (Google)
- TXT Value/Points To/Destination value (Zoho)
- Points to address or value (Microsoft Office)
DKIM record setup for cPanel
1. Log in to cPanel
2. Navigate to the Domains section
3. Select the Zone Editor
4. Click the Manage button next to your domain name
5. Click the Add Record button
6. In the Name field put the selector from the field:
- DNS Host Name (Google)
- TXT Name (Zoho)
- Host name (Microsoft Office)
7. Select the TXT record type for Google and Zoho, CNAME for Microsoft Office
8. In the Record field put the TXT record from the field:
- TXT record value (Google)
- TXT Value/Points To/Destination value (Zoho)
- Points to address or value (Microsoft Office)
9. Click the Add Record button and you’re done!
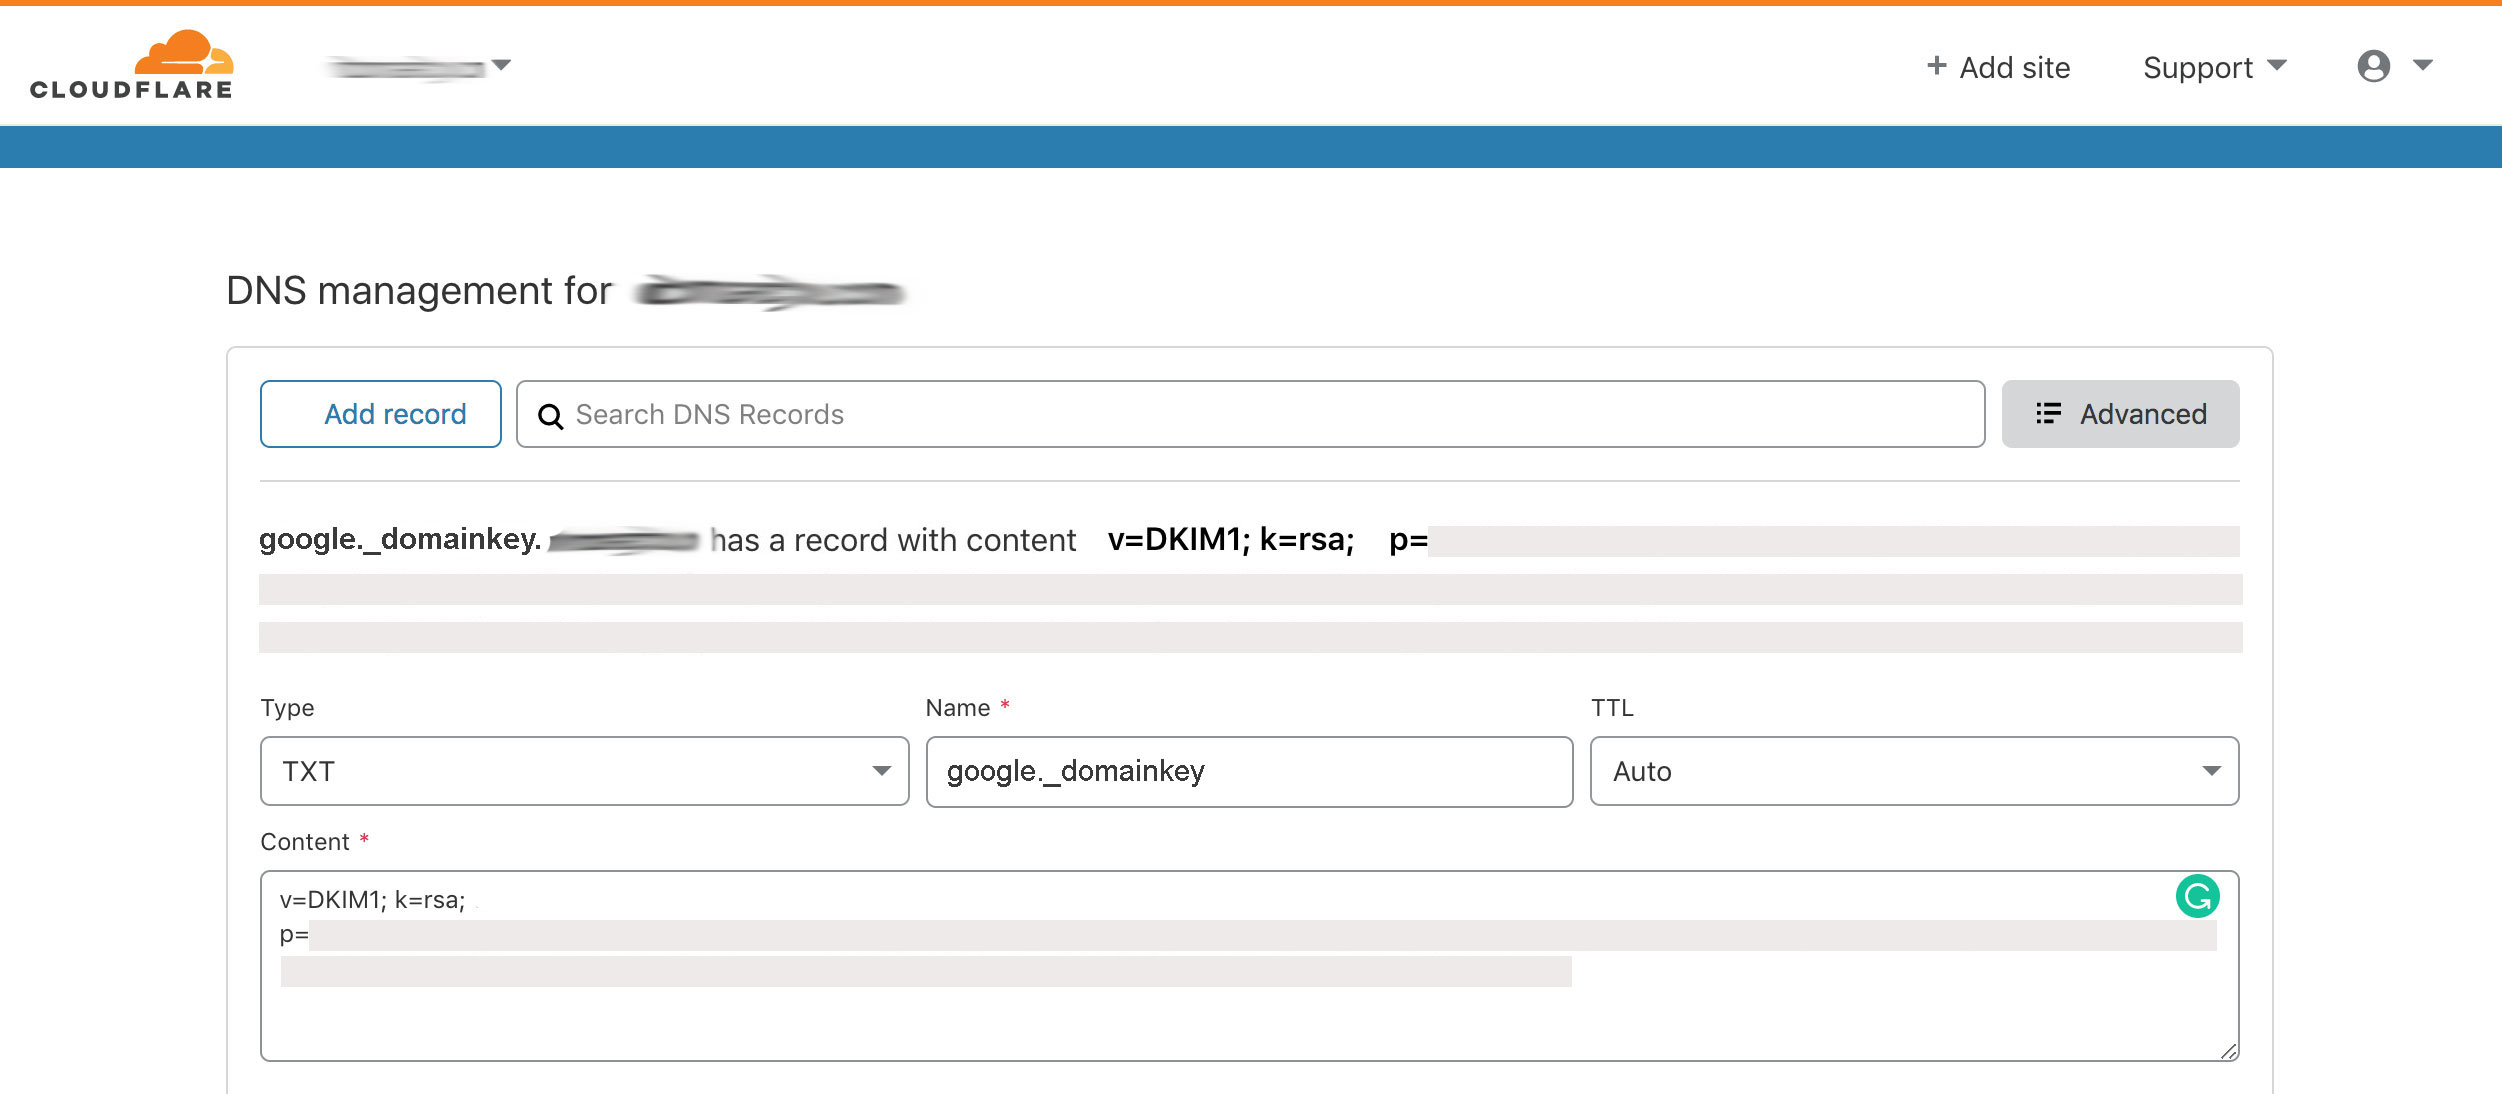
DKIM record setup for Cloudflare
1. Log in to Cloudflare
2. Click the DNS button
3. Click the Add record button
4. Select the TXT record type for Google and Zoho, CNAME for Microsoft Office
5. In Name put the selector from the field:
- DNS Host Name (Google)
- TXT Name (Zoho)
- Host name (Microsoft Office)
6. In the Content field or Target (CNAME) put the TXT record from the field:
- TXT record value (Google)
- TXT Value/Points To/Destination value (Zoho)
- Points to address or value (Microsoft Office)
7. Click the Save button and you’re done!
DKIM record setup for Bluehost
1. Log in to Bluehost
2. Go to Domains and select your domain
3. Click the Manage button
4. Select the DNS tab
5. Click Add Record in the TXT section for Google and Zoho or in the CNAME section for Microsoft Office
6. In Host Record put the selector from the field:
- DNS Host Name (Google)
- TXT Name (Zoho)
- Host name (Microsoft Office)
7. Under TXT Value / Points To (CNAME) put the TXT record from the field:
- TXT record value (Google)
- TXT Value/Points To/Destination value (Zoho)
- Points to address or value (Microsoft Office)
8. Click Save and you’re done!

DKIM record setup for GoDaddy
1. Log in to GoDaddy
2. Under the My Products, find your domain
3. Click the DNS button
4. Click the ADD button
5. Select the TXT record type for Google and Zoho, CNAME for Microsoft Office
6. In Host put the selector from the field:
- DNS Host Name (Google)
- TXT Name (Zoho)
- Host name (Microsoft Office)
7. Under TXT Value put the TXT record from the field:
- TXT record value (Google)
- TXT Value/Points To/Destination value (Zoho)
- Points to address or value (Microsoft Office)
8. Click Save and you’re done!

DKIM record setup for Namecheap
1. Log in to Namecheap
2. From the Domain list, select your domain
3. Click the Manage button
3. Click on the Advanced DNS tab
4. Click on the Add new record button
5. Select the TXT record type for Google and Zoho, CNAME for Microsoft Office
6. In Host put the selector from the field:
- DNS Host Name (Google)
- TXT Name (Zoho)
- Host name (Microsoft Office)
7. Under Value put the TXT record from the field:
- TXT record value (Google)
- TXT Value/Points To/Destination value (Zoho)
- Points to address or value (Microsoft Office)
8. Click on SAVE ALL CHANGES and you’re done!

Now when your domain’s DKIM record is set up correctly and protects it from email spoofing, you’re good to go 😎 DKIM adds an encrypted signature in the header of all the emails you sent and helps the receiving email server verify that the message was not edited in transit.
Setting up your DKIM record is one of the steps for improving your email security. Check related articles on how to set up your domain's SPF records and MX records!